Sunday, June 28, 2009

No Airplane Building the Past Few Days


Family stuff!! Was out of town on Thursday, Renee's birthday was on Friday and our two girls were back in town for Heather's bridal shower this weekend. In the photo, Heather is top center and Megan is top right. I did get a belated Father's Day present which I promptly and proudly hung up in the hanger (garage).

Heather heads back to Seattle on Tuesday, so then will be able to get back to the canopy and cowling.

Wednesday, June 24, 2009

Trimmed the Canopy Forward Tip


Trimmed the forward tip of the canopy near the pivot bolt for clearance. Used the sandpaper flapper in the die grinder and the flat sandpaper blocks. I had to remove and reinstall the canopy about three times to get the clearances correct. Also rounded out the pivot bolt hole with a small sanding drum in the Dremel. Mixed a batch of pure epoxy and coated the foam at the pivot bolt hole. Mixed some epoxy/flox and filled the void under the glass at the tip where the foam broke on me forward of the pivot bolt hole on the one side.

Time Today - 3 hours

Tuesday, June 23, 2009

Canopy Removal and Fiberglass Trimming


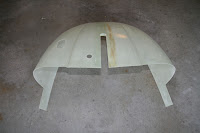
Used a Wilton cake frosting knife, very thin and flexible to break the bond between the fiberglass and the clear celephane tape. You can see the air bubble grow as you work the knife under the surface.

Cut the fiberglass over the bolt hole using the Dremel and a variety of bits. The very thin cheap abrasive bits worked the best as they did not grab the edges of the bolt. They really don't have a cutting edge on them, just some diamond abrasive. Cut just enough to get the socket over the head of the bolt. Will have to round it out after removal. Took about 1.5 hrs for both bolts. Hold the Dremel with two hands, it will want to jump on you. Removed the two pivot bolts. They will have to be replaced as the grinding marked up the heads a bit.

Thought removal of the canopy was going to be a chore but it came off VERY easily. No pops, crackles or squeaks. The wax I used worked!! Lifted the aft end about an inch on both sides, Renee assisting. Then slid the canopy aft until there was clearance near the forward tips and lifted the assembly up and off. Put the canopy on the workbench.

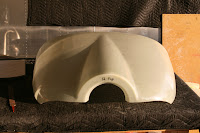
Marked the center line of the canopy by merely connecting the lines on the left and the right with a straightedge.

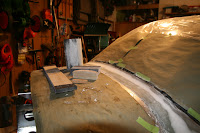
Then used the tools as shown in the photo to sand to the line. Left a little more more material below the canopy skirt line, for the first cut.

Reinstalled the canopy to recheck and remark the canopy skirt line. More sanding on Wednesday. Have the canopy skirt line, the bolt holes and the forward tips to do.

Time Today - 6 hours

Monday, June 22, 2009

A Good Day at the Airplane Factory


Mounted the nosegear this morning. Used a fish scale to set the tension of the swivel. Worked well and the new nosegear assembly received from Van's fit very well. The plane is now on all three wheels. Neat!!

Then worked a bit on the fit between the lower cowl and the upper cowl. Put them together, drilled, then cleco'd the inboard hole per the plans. Then cutout the nosegear slot, the gascolator hole and the exhaust oval. (At least that is what I think the additional holes in the lower cowl will be used for.) Used a small sanding drum in the die grinder, after cutting the rough shape using the reinforced cutoff disks in the Dremel, it worked well. Hand sanded to the line. Lots of dust!

Then marked the canopy fiberglass for the final cut. Found the pivot bolt hole was NOT exactly in the position per the template. The center of the pivot bolt was OK vertically but was 3/32" aft of the position as the template suggested. MARK the position of the center of the pivot bolt before you start glassing so you know where it is.

Cleaned the shop and put away a bunch of tools.

Time Today - 7 hours

Friday, June 19, 2009

High Winds, Lost a Tree, Blue Angels


Had some strong winds late afternoon on Friday. Lost a tree in the yard. Straight line winds of 70-80 MPH. But got to see the Blue Angels flying over the house practicing for the airshow on Saturday and Sunday.

Bottom Cowl, Nosegear Assembly Back from Van's

Spent Thursday and Friday working on the bottom cowl section. Found some REINFORCED cut off disks for the Dremel and they worked so much better. A lot of sanding with some 60-80 grit sandpaper to sand to the line. Found out that I had 2 scribe lines on the right half of the lower cowl. Sanded to the upper mark. Fitted the upper and lower cowl sections together and found that I have to do a bit of match sanding to do to get a tight fit. The Quad Cities airshow is on Saturday and Sunday. Will take Adam to see the Blue Angels.

Received the replacement nosegear assembly from Van's. Will install it.

Time Thursday and Friday - 6 hours

Wednesday, June 17, 2009

Started the Cowling-More Canopy Sanding


Sanded my 2nd coat of micro this morning and still found some low spots and pits. Filled them with a 3rd coat of epoxy and microballoons. More canopy fiberglass sanding on Thursday.

Then prepared the top cowling per the plans. Used a die grinder with a cutoff wheel and the Dremel with a cutoff disk to trim and remove the required material to within 1/8" of the scribe line. Be careful when using the die-ginder and a large cutoff wheel. It is hard to go around a curve without going over the line. Then used a vixen file and a sanding block with 80 grit paper to sand to the line. Lots of dust. WEAR safety glasses and a dust mask!! Also the Dremel cutoff disks break easily. (One of the disk pieces hit my safety glasses!!) Prep of the top cowling piece took me 4 hours.

Time Today - 6 hours

A Very Nice N-Number Search Engine

Found a very nice N-number search engine. Much better than the one on the FAA website.

N-Number Search Engine

Then Reserve Your N-Number Here on the FAA website

RV White Pages

The RV White Pages (RVWP) are quite useful for finding those folks passionate about *your* model and for networking with those folks that live near you that also might have a RV project in the garage! ADD YOUR NAME!!!

RV White Pages

Add/Edit Your RV White Page Entry

Tuesday, June 16, 2009

Sanding and More Micro


Spent about 4 hours yesterday sanding the filler. I think I removed 80-90% of it. Used a variety of flat blocks and formed the curve between the dash and the canopy with some sandpaper attached with spray adhesive to a 6 inch length of 3" PVC pipe. I tried to work slow and not remove too much of the filler. You want to be careful with the 3" PVC pipe because you can easily go too deep and form a valley.

I was able to determine where more sanding was needed by running my finger on the surface. Was able to detect much more this way, rather than relying on the eye.

All in all, the shape ended up well. But, even though I put this first layer of micro on quite thick, to avoid multiple layers of micro, another application will be necessary to fill some low spots and some pockets in the surface (maybe caused by some small air bubbles). Will circle the spots that need additional fill with a pencil and fill just those areas.

Filled the low areas today with micro. More sanding on Wednesday.

Time Yesterday and Today - 5 hours

Sunday, June 14, 2009

Canopy Continued - Microballoon Filler


Did a little more sanding on the fiberglass to remove the high areas and then scuffed the entire surface with corase grit sandpaper where I would be adding the filler to the areas that were low.

I first did the left side and then the right side.

Mixed a small amount resin/hardener and painted a very thin coat on the left side. Used a squeegee to remove all of the resin with the exception of a very thin layer. Mixed another batch of resin/hardener and added the microballons until I got the consistency of mayo. Used a popscicle stick and the squeegee, bending it as necessary, to apply the filler to the low spots on the left side. Repeated the process on the right side with separate batches of resin/hardener/micro.

I put the filler on relatively thick. Per Dan Horton on the VAF forums...."Better to apply too much than too little; adding more to thin spots later tends to result in uneven sanding density." (Differing amounts of microballoons give you differing hardnesses.)

As you can see from the pictures, I am far from being an auto body expert, but, I have been told that filler sands relatively easy. I hope so!! A lot of it will be coming off.

Sure looks like a real mess right now!!!!!

Time Today - 3 hours

Saturday, June 13, 2009

Back to the Canopy


Yesterday did a bit of sanding to eliminate any of the high spots on the fiberglass layups. Used a long flat board, forward and aft and a sanding block. Then spent a lot of time carefully sanding near the 2 layers of black tape. Sanded per the plans with the grits specified until I saw sanding marks in the 2nd layer of black tape. Used a short piece of wood 3/4" wide. Then carefully and slowly removed the 2nd layer of black tape. Did this slowly watching to see if the fiberglass edge started to lift or tear. Sanded a bit more in those areas. The first layer of tape lifted in an area and had to replace it.

Today did a little more sanding then cleaned the surface with compressed air. You have to get down very close to blow out all of the dust from the nooks and crannies. Mixed a small bit of epoxy and painted it on overlapping the tape layer. Did this only in the vicinity of the tape layer. May need to put another coat on the left side where I need a better transition between glass layers.

Time Yesterday and Today - 3 hours

Thursday, June 11, 2009

Installed Wheels and Brakes-On the Main Gear!!


Packed the wheel bearings with Mobil SHC 100 grease. Used the Handi-Packer as shown in the photo. It worked well. Attached the wheels and installed the brakes. Fabricated and ran the brake lines. The plans tell you to use thread sealant on the AN flare fitting threads. This is NOT correct. I did not insert the cotter pins, just in case the wheels have to come off. (I know I want to balance all 3 wheels. Have to get the "Motorcycle Wheel Balancing Stand" from Harbor Freight, $59, and get some self adhesive wheel weights.)

The nosegear will have to wait. Still waiting for the replacement from Van's as the original was warped.

Sure looks nice on the main gear!

Time Today - 4 hours

Wednesday, June 10, 2009

Another Fuel Tank Frustration

Van's just sent an e-mail to the finish kit builders indicating there may be a problem with the sightglass on the RV-12 fuel tank.

RV-12 Service Note

"During a recent inspection of Van’s prototype RV-12, it was discovered that the fuel tank sight window, T-1210, was ‘crazing’. While this window has been in service for a year, Van’s is investigating alternative materials that will better resist the harsh environment inside the fuel tank. If you have not installed your T-1210 sight window, Van’s recommends that you do not install it at this time. Van’s is currently researching alternative materials and will make new sight windows available as soon as we have procured that If you’ve already installed your T-1210 sight window, replacement may be required. However, Van’s recommends suspending any further work on your fuel tank and leaving the window installed until we have more information on a ‘fix’ for this issue. We apologize for this inconvenience."

My tank is complete. Leak-free and has been primed and final painted. To replace the window the top of the tank would have to come off. In addition the front of the tank would have to come off to reach the clips that are holding the fuel return line to the top of the tank. IMHO, a major pain. Plain and simple, it would be a disaster. Would be much better off just building a complete new tank. Thought I was done with fuel tank sealant. Sigh!

This material compatibility issue is a simple but major engineering error, realizing the tank is inside the fuselage.

There can't be many of us that have the tank complete as of today. The tank should be acceptable for the near term, but, for those of us that have it completed, the factory should supply us with a complete set of new tank components at no cost, within the next 6 months.

We will see if Van's treats this problem and the RV-12 builders that have completed the tank correctly.

Landing Gear Continues


Yesterday, I assembled the 2nd wheel and tire. I ran into a problem after tightening the shoulder washer nut. When I tried to attach the hub, the shoulder washer clearly interfered with the "fin" on the hub. This prevented me from inserting the capscrews to attach the hub. Called MATCO again and they acknowledged that they have seen this problem. MATCO told me either to file the edge on the hub where I was experiencing the interference or file the shoulder washer. I elected to do the first.

Then attempted to insert the gear leg in accordance with the plans. THE PLANS DO NOT WORK! The plans have you install the inboard wear plate and bracket and the outboard wear plate and bracket loosely. Then the plans instruct you to insert the gear leg. CANNOT BE DONE! It cannot be inserted because the side skin interferes. The outboard bracket is not hanging low enough for this to happen.

Today, I tried a method to insert the gear leg as suggested to me by Mike Tea. The inboard wear plate and bracket were attached loosely per the plans using the specified bolts, nuts and washers. There should be a good gap between the inboard wear plate and bracket.

NOTE: Before I forget, dry fit the parts with the bolts specified in the plans. I had to clean up some of the holes because the powdercoat finish would not allow the bolts to insert.

For the outboard wear plate and bracket I first inserted two hardware store variety 1/2" AN4 (1/4"-28) bolts from above. The two short bolts allowed be to center and tape the outboard wear plate to the bulkhead. With the wear plate in place, I removed the 1/2" AN4 bolts and attached the outboard bracket by inserting two hardware store 3" AN4 bolts from below securing them nuts above the bulkhead. This allows the bracket to hang a few inches below the wear plate. The gear leg can now be inserted and the tape can be removed from the outboard wear plate. The temporary AN4 bolts can now be replaced, one at a time with the hardware as specified in the plans. The AN6 bolt can be inserted. Torqued all bolts to specification.

Attached the axles and the stationary brake plate. (The axle cotter pin holes should be vertical). Then attempted to dry fit the brake puck assembly on the stationary brake plate. The brake puck assembly pins would not slide smoothly into the bushings on the stationary brake plate. Will have to call MATCO again tomorrow.

UPDATE: Called MATCO. Techincal Service first indicated that the parts are matched and asked if I swapped the stationary plates or the puck assembly from one to another. I did not think so. Then he indicated to realign the pins on the puck assembly to the bushings on the stationary plate, one inserts the pins into the bushings fully and then one loosens the capscrew and nut holding the pins to the puck assembly. Then you slowly retighten (and what I found best was to tighten them alternatively) the capscrew/nut. He indicated it may take a couple of tries. He indicated this is exactly what they do at MATCO. He also indicated that you could lube the pins with a dry graphite powder like that used for locks/keys. Tried it and it works very well. Also asked why one of the bushings looks like it has a groove in it. It is really two bushings that lock together.

A large washer and cotter pin was taped to the main axles. The washer in not shown in the plans or the MATCO manual. I am presuming the washer goes outboard next to the axle nut. Will place a post on the forums.

UPDATE: Per the VAF forum....."That is correct. The nut has a flange on it that fits into the washer." Problem solved.

Time Yesterday and Today - 10 hours

Monday, June 8, 2009

Section 35 - Landing Gear


Decided to take a break from fiberglass. Started on the landing gear. The first steps have you attach the engine mount. I will do it later.

Started to mount the nosewheel tire. I separated the wheels halves. Then observed that there was a shoulder washer, nut, another nut and the stem cap on the tube. None of these are shown in the plans. Looked at the MATCO manual that came with the main wheels and brakes and it showed these valve stem components. BUT, the nut passed thru the valve stem hole in the nosewheel. Something amiss? Called MATCO tech support and they supplied a drawing for the nosewheel.

Click here for the MATCO nosewheel drawing.

The shoulder washer goes inside the wheel half and the nut really is NOT captured by the hole, but just sits in the valve stem hole. This is a different arrangement than the one shown in the MATCO manual for the main wheels. Used talc to dust the inside of the tire and the tube and reassembled it.

Then started on the first of the main wheels. To install the tube and the tire, the entire wheel has to be disassembled. The brake housing, the brake disk, the wheel halves, and the bearings have to be removed. The wheel hub has to be removed from the inner wheel half. This was very difficult but was finally able to wiggle it free. To install the tube, you have to pass the valve stem through the inner wheel half hole and then install the shoulder washer and its nut. Then you can pass the tube stem thru the slot in the inner wheel half. Next I, inserted the tube/wheel half in the tire and brought the wheel halves together being careful not to pinch the tube. Going to be a pain to fix a flat!!

Specs for torquing the capscrews and the nuts are in the MATCO manual.

The bearings came with a light coating of oil. Will get some grease and pack the bearings the next day. The MATCO manual suggests a few grease types and MATCO technical support indicated Mobil SHC 100 was acceptable.

BTW, in reading the MATCO manual, noticed automotive brake fluid is NOT compatible with the brakes supplied with the RV-12. Take note.

Time Today - 4 hours